Mittwoch, 28. Januar 2009

Engine building


Here's the preliminary mockup of the right side engine valvetrain. It's assembled without gaskets just to see if everything will fit properly. Actually, there was an issue with the pushrods, the ones I ordered were too long, obviously made for engines without hydraulic lifters.
The rockers are 1to1.6 roller tip type.
We also checked the valvecover for proper fit over the rocker arms and even though it doesn't look like it, they clear well.
Pic of the wrong pushrods and the new ones in the right length.


Now I'm waiting for new pistons to beginn building the engine from the bottom up!


Freitag, 23. Januar 2009

hot seat


Got the front seats back from the shop. Did a great job pulling the new covers from legendary interiors nice and tight. The seats will be a little more firm due to additional bracing underneath...

Mittwoch, 21. Januar 2009

Seatframe


I got the frame for the rear seat back from sandblasting and powder coating. This is the kind of low profile part that you will never see agian once the interior is put back together but I would't want to know it even a little rusty back there in the car. The frames, seat and seatback, looked quite bad as you can see in the "before" picture, but luckily the rust was only superficial. Now that the frames are prepared in glossy black, they can move on to recieve a new foam core. The seats will be made a little firmer than original, via some extra webbing under the foam -
and then it's on to the new vinyl covers!

Montag, 19. Januar 2009

Wheels

Not that I'm ready to set this thing on its wheels yet but when the time comes I want to be ready :-)
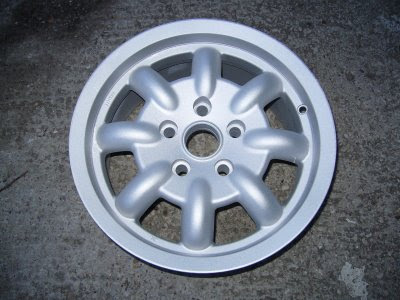
So I got started on the rims for the 'Cuda. This is the type of wheel that was widely used by the racecars of the trans-am series in the late sixties and early seventies. There are a lot of pics out in the net of the Cudas, Challengers and Camaros with wheels like these ringing it out an places like Laguna Seca, Mid America and Lime Rock. I bought these particular rims off a 1969 Mach 1 Mustang used for vintage racing - so they are FIA approved and will take a beating before they break apart. Th wheels were media blasted and prepped for paint. (Luckily ford and mopar share the same bolt circle and the offset fits as well) A good tight fit in the wheelwells!


I have the offer to have the outer lips polished, I think I'll have that done and just paint the inside of the wheel.

Donnerstag, 15. Januar 2009

Manual labor


Got the original mopar service manual by mail. Hopefully it will enable me to put everything back together, now that the whole car is torn apart to the max. Some of the pics and diagrams should enhance my memory of how everything was before being disassembled, others still seem rather confusing. Hope for the best.

Cool Aid


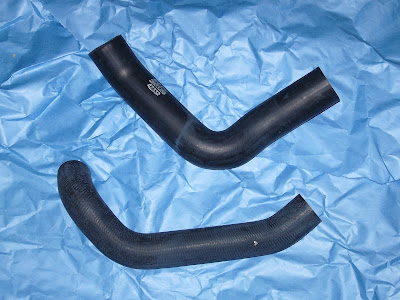
I've got everything together for cooling the engine. Well, everything exept anti-freeze and a few clamps. The Radiator is the original piece, redone with more cores for better performance and repainted original black. It's not painted very well, even though having it done was quite expensive - I could have bought two reproduction pieces for the same money...The fan shroud and radiator hoses are new pieces I got from year one.


The little white hose from the filler neck to the bottom of the radiator will also have to be renewed, will check if I can get a piece with the right dimension at a local hard ware store...


Montag, 5. Januar 2009

Non Mopar business


A little off-topic in between.
Picked up an old Corvette I bought with a couple of friends. We managed to cook the fluids on the first ride. Some genius has installed an unmarked switch for the fan...ok unless the temperature guage can be switched off on the electronic eighties dash...so you would have to turn on the fan, but you can't see if the engine is getting hot...go figure!

The 'Vette is an '87 and it's fairly well worn, but has some sweet parts in it. The stock 350 has been stroked to 383 cubic inches and the car has a good reputation running the local quarter miles...Plans are to paint it navy-blue, sort of faded, to give it a vintage style WWII fighter plane look.


On go the graphics


Since it's january, the 'Cuda project is going into its second year! After watching a couple of episodes of overhaulin it's hard to believe this is taking so long but anyway...
Since the metalwork on the rear is finished, I've started with the graphics :-)

The panel in front of the door on the passenger side had to be built from scratch since the original looked like it had been hit by shotgunfire. I'm still amazed at how Chris does things, even the original circle stamping has been grafted on to the piece, I must admit I have no clue how that works. The new panel is even stronger than the original, it will take up some of the forces the additional bracing for the front suspension will pass on to this part of the chassis.


The passenger side lower windshield corner is also finished, it really looked rugged and it's a complicated piece as several panels come together here. One patchup piece I bought is incorporated here, the rest is built from scratch - very important stuff here, since the stiffness of the unibody very much depends on this area.


A small patch was also welded into the passenger side rear floorboard, the original piece looked good from under the car but after sandblasting quite a few very small holes became visible.